Depth of Field, Diffraction and High Resolution Sensors
NOTE:
This article was originally published with the title Depth of Field, Diffraction and the Nikon D800 / D800E. Cameras come and go, but I have decided against updating the article because
-
•the discussion is applicable to all cameras with high resolution sensors, and
-
•it’s nice to base discussion on a specific example.
Enjoy
Introduction
These days [2012/2013], it seems that the majority of the email enquiries I receive are from D800 owners. These guys take their photography seriously, and they want to know what they should be doing so as to get the sharpest possible images from this camera. Lurking behind their inquiries is the premise that there is something fundamentally inadequate about standard practice in dealing with depth of field and diffraction, at least when using a camera equipped with a sensor of such a high pixel count.
So let’s have a look at the D800 and consider how we may go about achieving image sharpness to the full potential of its sensor.
Types of Photos
In any such discussions, it is important, I think, to start with a consideration of the artistic aims we have when we take a photograph. For example, when photographing people, some of us prefer to render the background as blurry as possible. The background is often unimportant and distracting (the notable exception is in travel shots), so we may want it to go away (in the nicest possible way, of course, with beautiful bokeh), leaving only a pleasing hint of the physical setting of the photograph. On the other hand, in landscape and similar photography, we’d almost certainly want the sharpest image we can possibly get across the whole field, from the nearest to the furthest elements in the photo. In such photography, an object sitting at the focus distance may be no more important (in terms of how sharp we want it to look in the image) than any other object in the scene.
I situations like the former, where you may want (or are willing to tolerate) shallow depth of field, using the D800 to the full potential of its sensor is relatively easy: Use quality optics, minimise vibrations, use a low ISO… and avoid apertures that result in too much diffraction (as you’ll see below, that means shooting at f-numbers below f/8). Do all this and your subject—which will be at the focus distance—will be rendered beautifully sharp. Everything else will be blurred to some extent, but who cares?
By comparison, in landscape and similar photography, where we usually want a significant amount of depth of field, things are more complicated. It is that type of photography that we’ll discuss here.
The Sensor
The Nikon D800 is blessed with a 35.9 x 24 mm, 7360 x 4912 pixel sensor. It thus packs 7360 pixels into 35.9 mm (and 4912 pixels into 24 mm). That makes 205 pixels per mm. And that makes each pixel about 5 microns in size.
At best, the smallest detail that a sensor can resolve spans the width of at least two pixels. So the D800 should be able to resolve image detail as small as 10 microns or so.*
The question is, how can we make full use of the sensor’s potential?
Depth of Field
Only objects at the focus distance are absolutely sharp in the image made by the lens (assuming excellent optics and minimal diffraction). The images of objects to the front or rear of the focus distance will be blurred (we call this defocus blur). If an object is only a wee bit to the front or rear of the focus distance, its image will only be very slightly blurred. And if the blur size is smaller than 10 microns, we can be happy—the D800’s sensor cannot resolve blurs smaller than about 10 microns, so the image of that object, as captured by the sensor, will appear as sharp as it can possibly be (just as sharp as if the object were at the focus distance).
If an object is located rather more than just a wee bit to the front or rear of the focus distance, its image will form a larger blur. How far from the focus distance can an object be before it is actually recorded by the sensor as blurred, i.e. before its defocus blurs is larger than 10 microns? Well, finding that out is what a depth of field calculator is for.
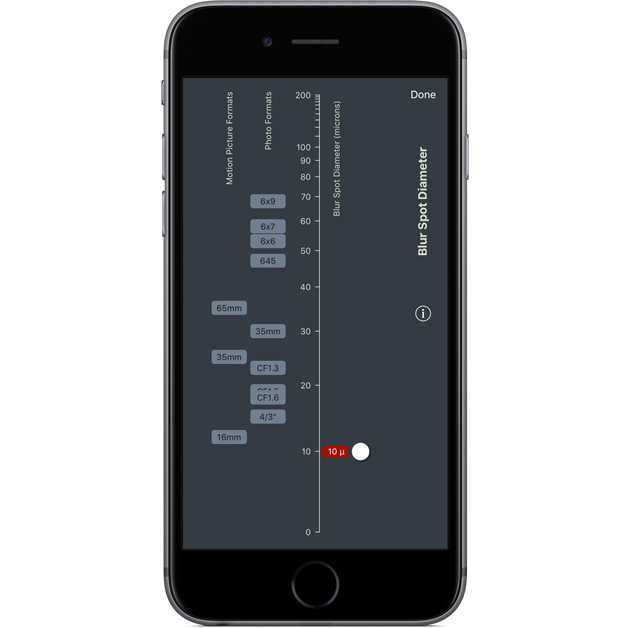
Start by setting the blur diameter, or “circle of confusion,” to 10 microns. Yes, that’s a lot smaller than the “recommended” 30 micron circle of confusion for a 35 mm sensor. But that recommendation has its origin back in early 20th century film practice, while you’re using a Nikon D800, so just ignore it.
Any quality depth of field calculator will enable you to set a custom circle of confusion. Here’s how you set it on TrueDoF-Pro:
[TrueDoF-Pro is unique in that it includes the effects of diffraction in its calculations, but we’ll leave a discussion of that for later in this article.]
Having set your target blur diameter, you perform your calculation on the main screen. When you do so, the calculator will place the near and far limits of depth of field at the distances that yield blur diameters of 10 microns. Assume, for example, that you’re using 24 mm lens, that your focus distance is set to 4 m, and that the aperture is set to f/5.6. You’ll get this result:

The black markers on the distance display indicate that objects located about 3.2 m from the camera, and objects located roughly 5.4 m from the camera, will have defocus blurs 10 microns in diameter. Objects between those distance extremes will have blur diameters smaller than 10 microns (and thus will appear sharp, because the D800 will not record them as blurs), while those outside these extremes will have larger blurs (which the D800 will indeed show as blurs).
Hmmm, that’s a very shallow depth of field (only 2.2 m). That can be very inconvenient. A 24 mm lens has a wide field of view, so it takes in foreground objects that are quite close to the camera and, for outdoor shots, will likely include objects all the way out at infinity. You will find very few photographic subjects that will fit into a depth of field as shallow as the one we just calculated. In most of the scenes you wish to photograph with such a lens, therefore, you will not be able to render everything in the scene absolutely sharp.
What if we use a different focal length? If we use a longer focal length, the depth of field becomes even narrower (very significantly narrower)! If we use a shorter focal length, we get more depth of field, but we also get more of the scene in our shot, with foreground elements in our photo being very close to the camera (and, again, far elements often being way out at infinity), so we may still find ourselves needing more depth of field that you can usually achieve.
It therefore seems that, in practice, what you can achieve in terms of absolute sharpness across the whole scene will primarily be limited, not by the D800’s sensor, but by the laws of optics—you have a great sensor in that camera, but it seems that the laws of optics won’t often allow you to use it to it’s full potential.
Hang on though. There is a way to get more depth of field, a way we have yet to discuss: We could use a larger f-number. If we’re going to go down that route, though, we had better watch out that we don’t come up against the effects of diffraction.
Diffraction
Diffraction is the blurring that light experiences when it passes through openings (in this case, through lens diaphragms). Due to diffraction, a point-sized object will appear in your image, not as a point, but as a blur. There’s an easy way to calculate the diameter of that blur spot: Divide the f-number by 0.75. That gives you the blur diameter in microns.
Let’s work the other way round, though. We know that the D800 can resolve detail as small as 10 microns. So we’ll ask, what aperture will result in a diffraction blur diameter of 10 microns? Well, an aperture of about f/8. Stop down to f/8 or beyond (to larger f-numbers), and your D800’s sensor will capture that blurring that diffraction causes. Don’t want diffraction blur to show up in your image? Then don’t shoot at f/8 or above. Bottom line: You cannot get absolutely sharp images with your D800 if you shoot at f-numbers of f/8 and above.
Is the D800 therefore more prone to the effects of diffraction that other cameras? Not at all. Diffraction is a property of the lens, not the sensor. It doesn’t matter what sensor you use—the amount of diffraction will be exactly the same at any given f-number. With a high pixel density sensor like that in the D800, though, you’re able to detect smaller blur spots that you could with a lesser sensor.
Defocus and Diffraction
It’s all good and well to discuss defocus and diffraction individually, as we have just done, but when is comes to the blurring of images, what counts is the combination of defocus blur and diffraction blur, since both effects occur simultaneously. When you set the blur spot diameter in TrueDoF-Pro, you’re actually setting the diameter of the actual blur, the blur that’s due to the combined effects of defocus and diffraction. The red needles on the distance scale indicate the positions of objects that have image blurs equal to the diameter you specified on the settings screen (10 microns).
If you start at a low f-number and gradually increase it, you will see the two red needles diverging. By increasing the f-number you’re reducing defocus blur, so objects can be quite far from the focus distance before they end up appearing blurry. Yes, you’re simultaneously adding some diffraction, but not a terribly significant amount just yet. As you continue to increase the f-number, however, diffraction starts making a significant contribution. From about f/5.6, you’ll notice the red needles start to converge. This is because only objects close to the focus distance can appear sharp (the defocus blur is small for those objects, and serves to counteract the significant blurring due to diffraction). By the time you get to f/8, there is so much diffraction that no part of the image contains blurs smaller than your specified 10 microns, not even objects at the focus distance, so the region meeting your sharpness criterion, as indicated by the red needles, collapses to zero.
How to Shoot With the D800
You may have concluded that, when photographing a scene with important objects located at various distances from the camera, achieving image sharpness to the absolute potential of the sensor is nigh on impossible. If you insist on achieving image sharpness down to 10 microns, you need to avoid large f-numbers (so that diffraction does not overly intrude) while finding a way of reducing defocus blur at small f-numbers. Well, time for some good news: That can actually be done, and there’s nothing new in how you go about it: Get yourself a lens that incorporates movements, specifically tilts. Or, if you do want to try something that is indeed new, you could use the “focus stacking” technique and achieve almost limitless depth of field while shooting at small f-numbers. But we’re getting ahead of ourselves. Let’s look at methods for shooting with D800 in proper order: We’ll start with practical approaches with regular lenses and no fancy optics or multi-shot techniques, then look at the more advanced methods.
1) The ’just good enough’ approach
This is the traditional approach. It is the way accomplished photographers have worked with depth of field issues over the generations. They have not accepted “recommended” circle of confusion values, such as 30 microns for 35 mm format cameras (30 microns was never good enough for serious work). Instead, they have experimented to see what works for their particular needs.
Stated simply, you need to “tune” your depth of field calculator so that you can be confident, when you use it, that your images will be sufficiently sharp. (This is why good depth of field calculators allow setting of custom circle of confusion values.)
In photography, what really matters is not so much what’s on the sensor, but the final product. Ultimately, the image that’s viewed by you, a human being, is what matters. How big are you going to make that image? How will it be displayed (on what medium—computer screen or print)? From what distance will it be viewed? In what sort of light? And so on. You need to determine what quality you want in the final image as displayed, and then you need to work backwards to determine what image quality you need on the sensor in order to achieve your goals.
Almost all of us love to examine our images at 100% zoom in Photoshop. Seeing and manipulating an image (well, a very tiny portion of it) at 1:1 pixel ratio is, however, an exercise that has real value only in technical terms. As art, it’s your image viewed as a whole that matters, not little bits of it at high magnification.
Setting your target blur diameter as low as 10 microns is only necessary if you’re going to view your image at a high enough magnification to be able to see the smallest details the sensor can resolve. If you’re not going to blow up your image that much (and chances are that you won’t, unless you’re planning to make a huge print), then you can relax your target blur criterion. You certainly won’t choose 30 microns, but perhaps 20 microns might be sufficient? Or perhaps not? You need a way to find out. And there are two possible approaches to this: Carry out appropriate calculations, or experiment and see what works. Now, I love doing calculations, but I have to be honest: That’s not the best approach here. It’s way too complex and there are way too many variables. In the digital photography age, where you can take as many shots as you like, at no extra expense, and where it’s no trouble at all to view your images at whatever magnification you like, it’s easy to go straight to taking some test images. And, let’s face it, at the end of the day, you’ll have to let your eyes, not the math, be the judge. Just remember to judge sharpness at the appropriate magnification (i.e. at the magnification that corresponds to that at which the final image will be displayed). And, ideally, if the final product is going to be a print, you’ll make test prints (or, to save money, test prints of small sections at the appropriate magnification).
Once you know that a particular circle of confusion gives you satisfying results (for your individual needs), you can go off and use that value in depth of field calculations (and you may use different values for different needs). If you choose a value of 15 microns, for example, you’ll know that all objects located between the red needles on TrueDoF-Pro’s distance scale will appear as blurs no larger than 15 microns.
Well, that’s one approach. And many photographers will feel comfortable with it, because it’s not actually new (the only thing that’s new is that you now have a depth of field calculator that takes diffraction into account, and therefore treats image blur realistically). But there is now a much better way to do things.
2) The optimum approach
This second approach is fundamentally different to the one above. And definitely superior. Do you see what the problem is with the above approach? It requires that you’ve already made up your mind, before you take the shot, about what the final product will be. That’s OK if you’re a professional on assignment, or an artist with a particular goal in mind, but even then you probably prefer not to restrict yourself to taking shots that are merely good enough for some specific need. What if you change your mind, after you’ve taken the shot, about what you intend to do with an image? What if you subsequently decide that you’d like to make a bigger print than you originally intended? The above approach limits you to obtaining results that are good enough for a particular need—it does not necessarily give you the best results that are physically possible. Is it not best to take the sharpest possible shot, every single time? I am certain this is what Nikon D800 users want. I know of only one way to achieve this: Use the focus distance and aperture settings determined by the OptimumCS-Pro app. This app chooses the settings that minimise, for each particular shot, the combined effects of defocus and diffraction, so that you can shoot the sharpest possible photographs every time.
Let’s take an example: Again, we shall use a 24 mm lens. We’ll enter that focal length into the app. We’ll also enter the distances to the nearest and furthest objects that need to be sharp in our image. Let’s say those distances are 2 m and infinity. From this information, the app determines the focus distance and aperture that give the sharpest possible photograph of the scene we have composed. These outputs turn out to be 4 m and just under f/11, respectively. (For info on how these outputs are calculated, see OptimumCS-Pro Optical Science.)

Just how sharp will this image be? Well, the pointer on the resolving power display—the one on the right on the main screen—is at 20 microns. This is telling you that a point sized object, located at either of your chosen near or far distance extremes, will appear as a blur 20 microns wide. All objects between the distance extremes will appear as blurs smaller than this size.
Yes, in this particular example, shooting at the indicated aperture introduces a lot of diffraction. You’ll have about 14 microns of diffraction blur across you entire photo. But there’ll be only about 6 microns of defocus blur for objects located at the two distance extremes (2m and infinity), making a total of 20 microns for those objects. For objects between those distance extremes, defocus blur is less than 6 microns, falling to zero for objects at the focus distance. So across you image, blur will range from 14 microns (for objects at the focus distance) to 20 microns (for objects at the distance extremes). There are no focus distance and aperture settings that can give you a total blur of less than 20 microns at your chosen distance extremes. If you shoot at a larger f-number, the extra diffraction will outweigh the reduction in defocus blur and you’ll end up with more than 20 microns. If you shoot at a smaller f-number, the extra defocus blur will outweigh the reduction in diffraction blur and you’ll again end up with more than 20 microns.
In this example, the D800 does not resolve detail to the limit of its sensor’s capabilities. Still, the photograph will withstand a significant amount of enlargement. Just how much enlargement you go for is up to you (there are too many variables to allow for a definitive answer, so just try it out and see what you’re happy with). You will know that there is no way you could have got a sharper shot at that focal length of that particular scene (with objects at those particular distance extremes).
How about another example? This time you’re using a 14 mm lens. Again, you want everything from 2 m to the horizon to be sharp in your image. Enter these values into OptimumCS-Pro and read the outputs: The optimum focus distance is 4 m and the optimum aperture is f/5.6.

How sharp will the image be? Well, the resolving power display indicates 11 microns. Remember, that’s the blur for objects at the distance extremes. Shooting at f/5.6 introduces about 7 or so microns of diffraction, and that’s added to whatever defocus blur there is at any given point. For objects at the distance extremes, the defocus blur is about 4 microns. Between those extremes, it’s less, falling to zero at the focus. So, total blur is about 7 microns (diffraction only) at the focus, rising to about 11 microns (defocus blur plus diffraction blur) at the distance extremes.
In this example, you’ll more or less use the D800’s sensor to its full potential. (Not that you’re likely to use a 14 mm lens this way. Such lenses are often used very close to foreground objects. Do that, and you’re back to larger blur diameters.)
Try some other examples yourself. Choose different focal lengths, and different near and far distances. In each case, the app will indicate the focus distance and aperture that will give the sharpest photo, and the resolving power display will show you how sharp that image will be. If it’s not going to be sharp enough for your needs, it’s not the fault of the camera or the settings chosen for focus distance and aperture—it’s simply a matter of how light behaves.
3) Using tilts
With proper use of tilts, you’ll get much sharper images. The problem with that approach is that it is not suited to all types of photography (nor even to all scenes) and takes a bit more time. So it’s not for everyone. But if you’re shooting landscapes or architecture, it’s definitely worth serious consideration. In fact, if I may be so bold, I would say that if that’s the sort of photography you do, you’re crazy not to get yourself a tilt-shift lens or two. That’s if you can afford to, of course. They’re not cheap.
To get the very best results, use tilts in combination with OptimumCS-Pro. The app comes with instructions on how to do this, and those instructions are repeated elsewhere on my website, so I won’t repeat them here. With this combination, you can often achieve astonishing sharpness—achieving the full potential of the sensor becomes much easier.
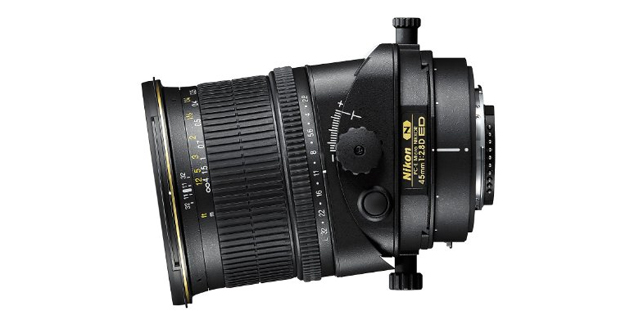
Nikon calls these lenses “perspective control” lenses, and they can indeed be used to control perspective. Unfortunately, such nomenclature ignores their other important function—control of depth of field. Nikon users can get these lenses in three focal lengths: 24 mm, 45 mm and 85 mm.
Canon users (if any are reading this article) have greater choice: 17 mm, 24 mm, 45 mm and 90 mm.
4) Focus stacking
Remember what our fundamental problem is? We want to use small apertures (to minimise diffraction) but, alas, we can’t get sufficient depth of field with small apertures (well, not with conventional lenses). Using tilts solves this problem, but only for scenes where the geometry happens to work in our favour. Now there is another way to solve this problem: focus stacking. Thankfully, focus stacking is not depended of subject geometry. And it doesn’t require that you go off and spend kilodollars on new lenses. And most people will find it easier to focus stack than to use a tilting lens (no geometry to get one’s head around). But it does have its own, unique limitations.
In principle, focus stacking is simple. We take a series of shots of the same scene, each of these shots focused at a different distance. Each shot will render objects at its particular focus distance nice and sharp, and objects just a wee bit on either side of that focus distance will also appear sharp (each shot has its own associated depth of field). Then, we combine these shots in specialised image processing software. The final image that results from this process is a combination of all the nice, sharp detail from each individual image. All of the blurry stuff is discarded. With enough shots of any given scene, we can achieve almost limitless depth of field at very high resolution.
What are the limitations to this technique? Well, as you may have guessed, taking multiple shots of the same scene can cause problems if there is movement in the subject matter (e.g. surf, or fast-moving clouds, or foliage blowing in the wind). Ideally, you would want the subject to remain unchanged from one shot to the next. So the technique works well for many architectural shots, and certain landscapes, e.g. deserts and mountains, shots taken under forest canopies and, often, shots taken at dawn, when the wind tends to be low. (Yes, there are methods in the software for removing the effects of subject motion, but these do have their limitations.)
How do we go about getting the best out of the focus stacking technique? We need to take as few shots as possible, so as to minimise potential problems with motion blur (and, frankly, to keep the amount of effort down), while seeing to it that each shot achieves whatever sharpness criterion we wish to meet, and also seeing to it that the areas of sharpness of the individual shots (their depth of field, as it were) overlap those of the adjacent shots. All of this is not easy to achieve (for example, the fact that depth of field is shallower at short distances means that many more shots are required up close than are required for the distant parts of the scene). And what is the aperture than one should use? It’s tempting to just give up on doing things properly and, instead, resort to the brut force method: take as many shots as possible, each at randomly chosen focus distances (well, random other than the fact that they are at successively longer distances), shot at an aperture that “feels” right. Hmmm… there has to be a better way. And there is.
The aptly named FocusStacker app uses the same algorithm developed for OptimumCs-Pro, but adapts it to the taking of multiple shots. In FocusStacker, one begins by specifying, on the setting screen, how sharp an image is desired (actually, one sets the target blur diameter). A Nikon D800 user might choose a value as low as 10 microns. Then, on the main screen, as in OptimumCS-Pro, the user dials in focal length and sets the distances to the nearest and furthest objects in the scene. FocusStacker displays the number of shots required to meet the chosen sharpness criterion, the aperture to use (thankfully, it’s the same for every one of the shots) and the distances on which to focus. Take the specified shots, combine them in your image processing software, and you’ll have a final shot in which everything from your nearest to your furthest object will be as sharp as you want (to the limits of what the sensor can deliver). Oh, and since we’ve mentioned software, it should also be mentioned that not all focus stacking software packages are created equal. For the quality of the images it creates (and for other good reasons, too), I recommend Zerene Stacker.
Let’s revisit a previous example. We’re using 24 mm lens and we want everything from 2 m to infinity to be as sharp as possible (which, for a D800, means no blur larger than 10 microns). We set 10 microns on the setting screen and set the focal length and the distances on the main screen. We then see that we need to take 4 shots, that we’ll shoot at f/5 and that we’ll focus at 2.3 m, 3.2 m. 5. 3 m and 16 m.
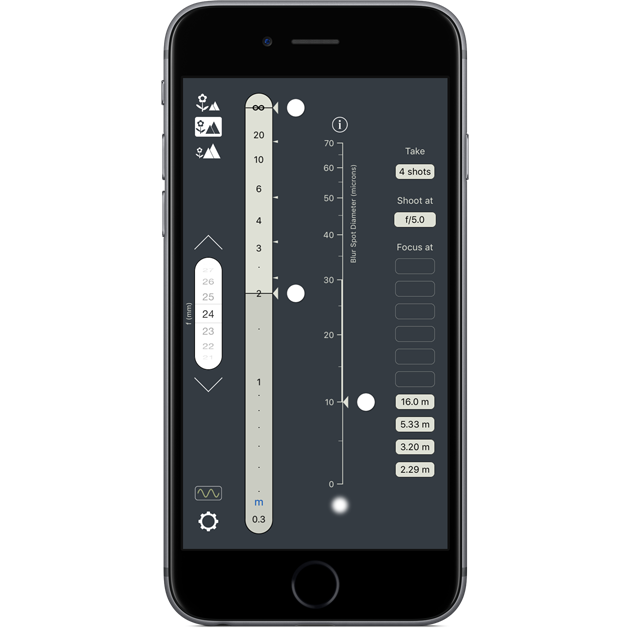
Our final image, after these shots have been combined, will be much sharper than any single shot of the scene, shot with a fixed lens, could possibly be (that single shot would display blurs as large as 20 microns, as shown in the earlier example).
Focus stacking is fun, and the results can be spectacular. And it’s not a difficult technique. So, in situations where you can use it, go ahead and use it.
Before we move on, though, a word of advise: Don’t get too ambitious with the sort of depth of field you go after. While, in principle, it is possible to achieve depth of field from a foot or so all the way out to infinity, all at 10 microns, in practice this requires an awful lot of shots to be taken, rendering the whole exercise impractical.
A more detailed but still non-technical discussion of what goes on in focus stacking (at the shooting end rather than the image processing end) is presented in the article Focus Stacking in Landscape and Architectural Photography.
Which method to use
I’d recommend that you be familiar with three different methods—the optimum method for fixed lenses, using tilts (in conjunction with the optimum method) and focus stacking—and that you be be willing and able to use whichever is best for any given situation. If you’re photographing a beach scene, for example, you’ll reject focus staking on account of subject motion, but the subject geometry is such that a tilt would work wonderfully. A complex interior architectural shot, on the other hand, may prove difficult to handle with a lens tilt, but may be perfect for focus stacking. And, in situations where time is pressing, or where neither a tilted lens (which you may not have) nor focus stacking will help, you’ll just have to make do with whatever a single shot will give you. Just make sure that it’s the best single shot you can get.
Conclusion
If you’re photographing scenes that do not require much depth of field, rendering your subject as sharp as your D800’s sensor will allow is a simple enough matter: Use quality optics, minimise vibrations, use low ISO and, above all, stay below f/8 on the aperture scale.
If you’re photographing scenes that do indeed require much depth of field, you will find, in the absence of specialised techniques such as lens tilting or focus stacking, that it is difficult to achieve image sharpness to the full potential of the sensor across the entire scene. Defocus blur and diffraction blur will always exist, combining to create, in many cases, blurring sufficiently large as to be detectable by the D800’s sensor. If you decrease the f-number to reduce diffraction, you get more defocus blur, while if you increase the f-number to reduce the defocus blur, you get more diffraction. For the best possible results, use OptimumCS-Pro to determine the f-number that minimises the blur for the objects most affected by it, i.e. those located at the near and far limits of your composition. Sometimes, that blur will be so small as to be undetectable by the D800. More often, though, it will not. But, by using the optimum settings, you’ll have the sharpest photograph of that particular scene that the laws of physics will allow you to achieve in the absence of more specialised techniques.
For the ultimate in image quality from the Nikon D800 / D800E in landscape and architectural photography, use OptimumCS-Pro in combination with a tilt-shift lens (if you can afford such things) or use FocusStacker with the focus stacking technique. Where the subject matter is such that these methods may be used (in practice, more commonly for the former rather than the latter), you will often find that you can indeed use the D800’s sensor to its full potential.

* Determining resolving power, or even adequately describing it, is a hideously complex business. The 10 micron figure I give here is sufficiently accurate for our purposes. If you disagree with it, that’s OK. Please feel free to substitute the value you consider appropriate— you won’t disagree by much, and the advice and overall conclusions presented in this article would remain unchanged. For similar reasons, we’ll ignore the difference between the D800 and D800E.
© 2012-16 George Douvos
.